
Git tries to make development easy, especially when there are teams of people working on project at the same time. The main way it does this is with branches. If you're working on something, you create a branch to work on it. Everything you do in that branch is isolated from everything else in the repository. You can make commits in the branch as you go along. When you've finished, you merge that branch into the main project.
In git, branches are just labels on a commit, so they're very cheap to create and cheap to switch between. Use branches a lot to stay focused on just some changes in a project.

Every repository comes with a master branch by default. But master is just another branch and you switch to and from it the same as any other branch.
Aside: a branching model
Even though everyone agrees that branches are good and we should use lots of them, not everyone agrees on how branches should be used to organise a project. Indeed, many people have Very Strong Opinions on the right way to use branches. I won't get into that here. Instead, I'll use a fairly commonplace approach. Heremasteralways holds a working version of the system, and there is one branch per feature. When a feature is complete, the changes are merged back intomasterand the feature branch is deleted.
Creating and using branches
Let's start looking at branches by continuing to work on the "novels" repository from part 1. I'll add a new "feature" of making the headers be capital letters.
The command git branch shows what branches are in the repository. git branch capitals will create a new branch called capitals. git switch capitals will switch to using the capitals branch. git status will tell us which branch we're currently on, as part of what it reports.
If you follow along with the command-line examples below, you'll first see that there is only one branch, master. I then create the capitals branch, and switch to make that the active branch. git log --oneline shows the state of play. The lg1 command (a fancy log; see the appendix) shows the same information, but a bit prettier.
$ git branch
* master
$ git branch capitals
$ git switch capitals
$ git branch
* capitals
  master
$ git log --oneline
* 7b2f7e5 (HEAD -> capitals, master) Third commit - Neil Smith
* 707372d Second commit - Neil Smith
* 0a411f8 First commit - Neil Smith
$ git lg1
* 7b2f7e5 - (2 days ago) Third commit - Neil Smith (HEAD -> capitals, master)
* 707372d - (2 days ago) Second commit - Neil Smith
* 0a411f8 - (2 days ago) First commit - Neil Smith
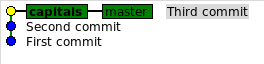
The history looks like this, grahically and perhaps a bit clearer than the above text. The point is that the current commit (marked in yellow below, called HEAD by git) has two branch labels pointing to it: master and capitals, with capitals being the current branch.
A note on versions and commands. Up to git version 2.23, thecheckoutcommand was used to switch branches. Confusingly,checkoutwas also used to restore files, and the syntax for both uses was itself confusing. In version 2.23,checkoutbecame the two commandsrestoreandswitch. But many tutorials online were written using the old commands, so you may see lots of references tocheckoutbeing used to do whatswitchdoes now.
Let's make a change in this new branch. In just one file, change the first # Commit 1 line to uppercase. Add and commit the changes, then look at the log.
$ git commit -am "Started adding capitals"
$ git lg1
* 7b2f7e5 - (3 seconds ago) Started adding captials - Neil Smith (HEAD -> capitals)
* 7b2f7e5 - (2 days ago) Third commit - Neil Smith (master)
* 707372d - (2 days ago) Second commit - Neil Smith
* 0a411f8 - (2 days ago) First commit - Neil Smith
You will see that HEAD and capitals now both point to the new commit, but master still points to where it did before.

Branches isolate changes
One of the touted advantages of branches is that they isolate changes in the branch, and away from the rest of the repository. You can see that now. Do the command git switch master to select the master branch. Look at the file you changed just above, and you'll see that it no longer has the uppercase # COMMIT 1 line. git switch capitals will make the capitals branch current again, and the uppercase change is back in the file.
This means that when you've finished working on one feature for a bit, you can switch to another branch and work on that, without having to worry about undoing changes or things being left in an unfinished state.
Branches keep all the changes, safely
Git is also clever enough to prevent you losing things when you switch between branches. If you try to switch branches when you have uncommited changes, git will complain and prevent it happening, but will prompt you with how to proceed; basically, commit the work-in-progress to save it in the repo's history, then switch to the new branch.
Try it by making more the header lines uppercase, saving the files, and then trying to switch branches. You'll find you can't. If you then add and commit the changes, you will be able to switch branches.
Many features, many branches
Each feature you're working on should be in a different branch. Let's set one up now with the "feature" of adding more text to the files in the repository.
Switch to master, create a new branch called extra_text and switch to it. Then add an extra paragraph to each text file. Commit these changes.
$ git switch master
$ git branch extra_text
$ git switch extra_text
$ vim edit frankenstein.txt
...
$ git commit -am "Added fourth paragraphs"
You'll end up with a history that looks like this:

$ git lg
* 016dfb6 - (5 seconds ago) Added fourth paragraphs - Neil Smith (HEAD -> extra_text)
| * 7033bb8 - (2 minutes ago) Headers now uppercase - Neil Smith (capitals)
| * 364ed5f - (2 minutes ago) Started adding capitals - Neil Smith
|/
* 81bb00e - (4 minutes ago) Third commit - Neil Smith (master)
* 98690f1 - (5 minutes ago) Second commit - Neil Smith
* 7c0dffe - (6 minutes ago) First commit - Neil Smith
As you can see, there are now three branches: master and two feature branches, captials and extra_text. Both of these branches have changes that are not present in the master branch. We can incorporate those changes by merging one branch into another.
Before you merge
Before merging, make sure to have your working directory up-to-date with the most recent commit, using commit or restore commands as needed. It will make life much easier if you make a mistake when merging and need to undo things.
Very easy merging
Merging always involves bringing in changes from that other branch into this branch. The first merge will be to incorporate the changes in the extra_text branch into the master branch.
$ git switch master
Switched to branch 'master'
$ git merge extra_text
Updating 81bb00e..016dfb6
Fast-forward
 carmila.txt      | 15 +++++++++++++++
 frankenstein.txt | 15 +++++++++++++++
 2 files changed, 30 insertions(+)
Remember, a branch is just a pointer to a commit. In this case, merging the extra_text branch into master just involves sliding the pointer for master up to the same commit that extra_text points to. This is known as a fast-forward merge.
We end up with the situation like this.

or, in the terminal:
* 016dfb6 - (25 minutes ago) Added fourth paragraphs - Neil Smith (HEAD -> master, extra_text)
| * 7033bb8 - (26 minutes ago) Headers now uppercase - Neil Smith (capitals)
| * 364ed5f - (27 minutes ago) Started adding capitals - Neil Smith
|/
* 81bb00e - (29 minutes ago) Third commit - Neil Smith
* 98690f1 - (30 minutes ago) Second commit - Neil Smith
* 7c0dffe - (31 minutes ago) First commit - Neil Smith
We don't need the extra_text branch pointer any more, so we can delete it with the git branch -d command. The git branch command afterwards just confirms that the branch has been deleted.
$ git branch -d extra_text
$ git branch
Easy merging
The next thing to try is to incorporate the changes in capitals into the updated master branch. This is more difficult than a simple fast-forward, as the two branches now have a different history.
Git manages this by creating a new merge commit that shows how the two branches were merged together. Because we're creating a new commit, we need to give a message to be incorporated into that commit.
$ git merge captials -m "Merging captials as headers"
Auto-merging frankenstein.txt
Auto-merging carmila.txt
Merge made by the 'recursive' strategy.
 carmila.txt      | 6 +++---
 frankenstein.txt | 6 +++---
 2 files changed, 6 insertions(+), 6 deletions(-)
That will take you from the structure on the left below to the one on the right.


Or, in text form, like this:
*   2bae42e - (5 seconds ago) Merging capitals as headers - Neil Smith (HEAD -> master)
|\
| * 7033bb8 - (26 minutes ago) Headers now uppercase - Neil Smith (capitals)
| * 364ed5f - (27 minutes ago) Started adding capitals - Neil Smith
* | 016dfb6 - (25 minutes ago) Added fourth paragraphs - Neil Smith
|/
* 81bb00e - (29 minutes ago) Third commit - Neil Smith
* 98690f1 - (30 minutes ago) Second commit - Neil Smith
* 7c0dffe - (31 minutes ago) First commit - Neil Smith
But how does git update the files? The files were different in the two branches. In this case, git was able to make good guesses about how the different changes should have been combined. If you look inside one of the text files, you'll see something like this:
# COMMIT 3
I try in vain to be persuaded that the pole ...

# Commit 4
Its productions and features may be without example...
Git has managed to combine the two sets of changes, even when they affect the same file. In many cases, git can make sensible choices about what changes to apply to create the final, merged versions of files. (If you're interested, you can control the strategy git uses to merge changes.)
Difficult merging
But what happens if git can't automatically merge the changes in the two branches? We'll step back a bit, make some more complex changes, and find out.
First, we'll undo the merge (git reset is covered in the next post in this series).
$ git switch master
$ git reset HEAD^1 --hard
...which takes us back to this situation, before adding the extra text.
$ git lg
* 7033bb8 - (2 minutes ago) Headers now uppercase - Neil Smith (capitals)
* 364ed5f - (2 minutes ago) Started adding capitals - Neil Smith
* 81bb00e - (4 minutes ago) Third commit - Neil Smith (HEAD -> master)
* 98690f1 - (5 minutes ago) Second commit - Neil Smith
* 7c0dffe - (6 minutes ago) First commit - Neil Smith
In the capitals branch, we changed the headings to be captial letters. We'll now create a different branch where we change the headings to use fancy text.
$ git branch fancy
$ git switch fancy
In one of the text files, change the headings to some fancy and overblown text: # Most fancy commit line 1 or something. Change all the headings. Commit the changes.
What will happen if we try to merge the changes in capitals into the fancy branch? (git is happy to merge any branch into any other branch: there's nothing special about master.)One branch changed the headings to use capital letters; the other changed the headings to use different words.
$ git merge capitals -m "Merging capitals as headers"

Auto-merging frankenstein.txt
CONFLICT (content): Merge conflict in frankenstein.txt
Auto-merging carmilla.txt
Automatic merge failed; fix conflicts and then commit the result.
Anything that says "merge conflict" and "merge failed" can't be good. If we look in the file the git told us about, we can see what git did.
# FRANKENSTEIN, by Mary Shelly

<<<<<<< HEAD
# Most fancy commit line 1
=======
# COMMIT 1
>>>>>>> capitals
...
These are conflict markers. They show where git detected conflicting changes in the two branches. In this case, git can't know which of these changes to carry forward to the merged version, so it's leaving it up to us.
In this state, we're half-way though creating a merge commit. We now either have to finish the merge by completing the merge commit, or back out and abort the merge attempt.
Backing out is easy: the command $ git merge --abort will take us back to the start just before starting the merge.
If we want to finish the merge, we have to resolve all the conflicts. git status will tell us which files still need attention. You will need to go through all the conflicted files and adjust them until they are in the correct form for the merge. Remember to remove the conflict markers as well.
Once you've resolved the merge conflicts in a file, git add it to the commit. Once you've done all the files, git commit the merge (with a new commit message). (Tools like KDiff3 and Meld offer a graphical way of handling merges which may be easier.)
Summary
There's much more to branching and merging in git, but this post covers most of what you need to handle most situations. It's covered the ideas of branches for different features, and how to merge changes from those branches back into the main codebase of the project.
Appendix: Viewing git's log
The basic commands git log and git log --oneline are good enough for showing what's going on in the history of a repository. But they can be improved. I like the prettier versions of the commands created by Slipp D. Thompson. To set them up in your instance of git, use these commands:
$ git config alias.lg '!git lg1'
$ git config --global alias.lg1 '!git lg1-specific --all'
$ git config --global alias.lg2 = '!git lg2-specific --all'
$ git config --global alias.lg3 = '!git lg3-specific --all'
$ git config --global alias.lg1-specific = "log --graph --abbrev-commit --decorate --format=format:'%C(bold blue)%h%C(reset) - %C(bold green)(%ar)%C(reset) %C(white)%s%C(reset) %C(dim white)- %an%C(reset)%C(auto)%d%C(reset)'"
$ git config --global alias.lg2-specific = "log --graph --abbrev-commit --decorate --format=format:'%C(bold blue)%h%C(reset) - %C(bold cyan)%aD%C(reset) %C(bold green)(%ar)%C(reset)%C(auto)%d%C(reset)%n''          %C(white)%s%C(reset) %C(dim white)- %an%C(reset)'"
$ git config --global alias.lg3-specific = "log --graph --abbrev-commit --decorate --format=format:'%C(bold blue)%h%C(reset) - %C(bold cyan)%aD%C(reset) %C(bold green)(%ar)%C(reset) %C(bold cyan)(committed: %cD)%C(reset) %C(auto)%d%C(reset)%n''          %C(white)%s%C(reset)%n''          %C(dim white)- %an <%ae> %C(reset) %C(dim white)(committer: %cn <%ce>)%C(reset)'"
You'll then be able to use these commands to give a prettier and more useful output. The lg1, lg2 and lg3 correspond to using one, two, and three lines per commit.
$ git lg
$ git lg1
$ git lg2
$ git lg3
A note on versions and commands. Up to git version 2.23, thecheckoutcommand was used to switch branches. Confusingly,checkoutwas also used to restore files, and the syntax for both uses was itself confusing. In version 2.23,checkoutbecame the two commandsrestoreandswitch. But many tutorials online were written using the old commands, so you may see lots of references tocheckoutbeing used to do whatswitchdoes now.
Credits
Cover photo by pine watt